
Introduction to the Electric Drill
Drill එක, එහෙමත් නැත්තන් විදුලි බුරුමය කිව්වාම හැමෝටම මතක් වෙන්නේ මේ පල්ලෙහා තියෙන රූපේ වගේ උපකරණයක් වෙන්න ඕන.
Everyone will remember a tool like below when it is mentioned “Electrical Drill”.
Drill එකක් කියන්නේ Tool Box එකක අනිවාර්යයෙන් ම තියෙන්න ඕන උපකරණයක්. ඒ වගේම නව නිර්මාණකරුවෙකුට නැතිවම බැරි උපාංගයක්. මේ ලිපියෙන් බලාපොරොත්තු වෙන්නේ වෙලදපොලෙන් Drill එකක් තෝරගන්න ඉන්න කෙනෙක්ට, තමන්ගේ වැඩේට ගැලපෙනම Drill එක තෝරගන්න උදව් වෙන එකත්, දැනටමත් Drill එකක් ලග තියෙන අයට ඒක ගැන තියෙන දැනුම වැඩි කරගන්න උදව්වක් වෙන්නත් එක.
අපි මුලින්ම බලමු අපිට මිලදීගන්න පුළුවන් Drill වර්ග මොනාද කියලා.
A Drill is a must-have tool in every toolbox. Also is an essential tool of an innovator. I’m expecting from this post to give some basic introduction on how to choose an Electric Drill based on the requirements. I also hope to explain the uses and features of the Drills. First, let’s see what types of Drills we can see in the market.
Corded Drill vs Cordless Drill
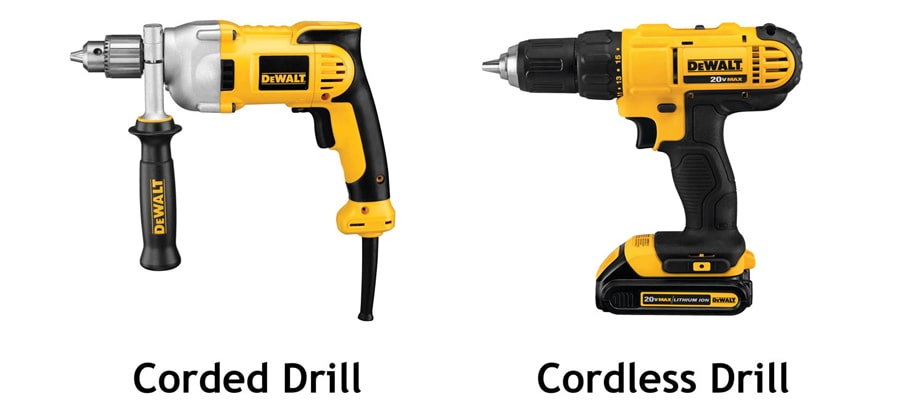
Corded Drills කියන්නේ වැඩ කරනකොට කේබල් එකකින් නිවසේ ප්රධාන විදුලි සැපයුමට සම්බන්ධ කරලා වැඩ කරන්න ඕන Drill වලටයි. එතකොට Cordless Drills කියන්නේ බැටරි වලින් වැඩ කරන, රැහැන් රහිත Drill වර්ගයක්.
සාමාන්ය තත්ව එක්ක බැලුවාම corded Drill එකක් මිලෙන් අඩුයි වගේම නඩත්තු කරන එකත් පහසුයි. Drill එකේ බලය තීරණය වෙන්නේ ඒකේ watts ගාණ අනුවයි. 400W ඉදලා 1500W වගේ ඉහල බලයක් තියෙන Drills වෙලදපොලෙන් හොයාගන්න පුළුවන්. එදිනෙදා වැඩ වලට වගේ නම් ගොඩක් වෙලාවට 550W වගේ එකක් හොදටම ප්රමාණවත් වෙනවා.
The most common type of Electronics Drills is the Corded Drill. It should be connected to an AC power source. And the other type is known as Cordless Drills, which are powered by batteries.
In general conditions, Corded Drills are cheaper and easy to maintain. The power of the drill will be decided on its wattage. We can find electrical drills in the market with 400W upward. For day-to-day works, an electric drill with around 550W is enough.
අනිත් පැත්තට Cordless Drill එකක් පාවිච්චි කරද්දී වයර් අදින කරදර අඩුයි වගේම ඕන තැනකට අරන් ගිහින් පාවිච්චි කරන්න පුළුවන්. DC Motor එකක් පාවිච්චි වෙන හින්දා ව්යාවර්තය (Torque) පාලනය කරන්නත් පහසුයි. Cordless Drills වල නම් බලය තීරණය වෙන්නේ ගොඩක් වෙලාවට බැටරි වෝල්ටීයතාව සහ උපරිම ව්යාවර්තය අනුවයි. බැටරි වෝල්ටීයතාව අනුව ගත්තොත් 12v, 18v, 20v වගේ අගයන්ගෙන් ගන්න තියෙනවා. වෝල්ටීයතාව වැඩි වෙන තරමට ගන්න පුළුවන් බලය වැඩියි. වෝල්ටීයතාවට අමතරව එක එක ව්යාවර්ත අගයන්ගෙනුත් Drills තෝරගන්න තියෙනවා. සාමාන්යයෙන් 20 Nm වල ඉදලා 300 Nm වගේ අගයන් දක්වා විවිධ Cordless Drills අපිට දකින්න ලැබෙනවා.
On the other way, Cordless Drills are very easy to handle and can be used from anywhere, without worry on AC power supply. Since the use of DC motor, the torque and the speed can be controlled better compared to AC motor in Corded Drills. The main parameters to measure the performance of Cordless Drills are battery voltage and maximum torque. We can find electric drills with 12V, 18V, 20V, etc. Higher the battery voltage, the drill is more powerful. Other than battery voltage, we can see Cordless Drills which are coming with different maximum torque amounts from 20Nm to around 300 Nm.
Cordless Drills වල දැනට තියෙන ලොකුම අවාසිය තමයි බැටරි ධාරිතාව අනුව පාවිච්චි කරන්න පුළුවන් කාලය සීමිත වෙන එක. බැටරි කිහිපයක් මාරුවෙන් මාරුවට පාවිච්චි කරන එකෙන් මේ ප්රස්නේ ටිකක් විසදගන්න පුළුවන්.
සාමාන්ය Corded Drill එකකට වඩා Cordless Drill එකක් මිලෙන් අධික වීමත් තව එක ගැටළුවක්. Drill එකට අමතරව බැටරි කට්ටලයක් (එකක් හෝ දෙකක්) වගේම බැටරි ආරෝපණ කරන්න Charger එකකුත් ගන්න වෙනවා. ඉස්සරට වඩා දැන් බැටරි තාක්ෂණයයේ දියුණුවත් එක්ක බරින් අඩු, වැඩි බැටරි ධාරිතාවක් තියෙන වගේම මිලෙනුත් අඩු Cordless Drills තියෙනවා.
The main disadvantage of Cordless Drills is the limitations of battery capacity. Having a few inter-changeable batteries will fix the battery capacity limitation. And also Cordless Drills are expansive compared to corded equivalents. It is required to buy a few batteries as well as a Battery Charger along with a Cordless Drill. But now we can see Cordless Drills with higher battery capacity, and low cost in the local market.
Main Parts/Features of a Drill
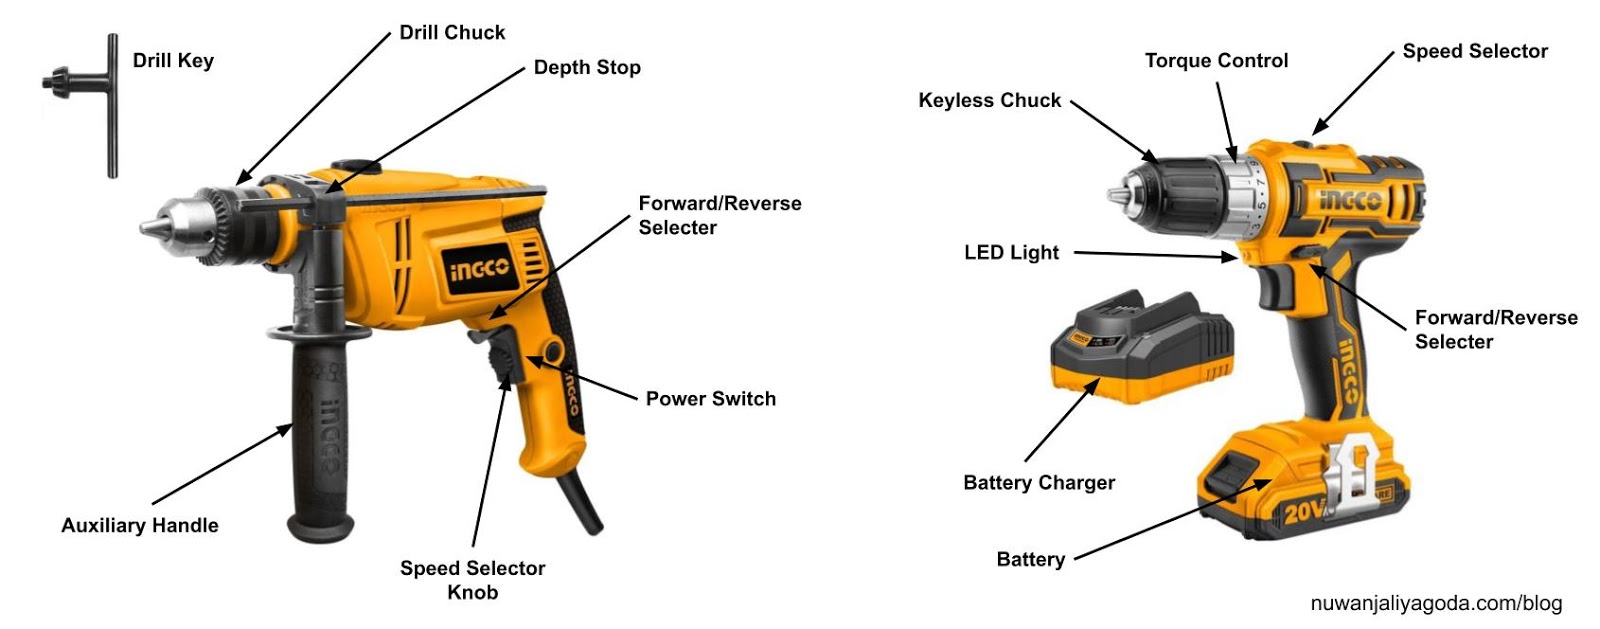
Drills වලට ප්රධානම කාර්යය වෙන සිදුරු විදින එකට අමතරව තව පහසුකම් ගොඩක් තියෙනවා. එක එක Drill models වල තියෙන මේ අමතර පහසුකම් වෙනස් වෙන්න පුළුවන්. නිතර හම්බවෙන ඒ වගේ පහසුකම් කීපයක් ගැන විස්තර කරන්නම්.
Yes, the main purpose of the Drills is to drill the holes, but we can see a lot of additional features are coming with the electronics drills. Let’s discuss some of them.
Trigger-activated LED
මේ පහසුකම තියෙනවා නම් Drill එක වැඩ කරන වෙලාවට ඉස්සරහා තියෙන LED එකක් පත්තු වෙලා, සිදුර විදින තැනට එලියක් ලැබෙනවා. ටිකක් අදුරු තැනක වගේ වැඩ කරද්දී මේක ගොඩක් ප්රයෝජනවත් වෙනවා.
If your drill has this feature, and when you are drilling a hole, you can see there is a small LED in front of the drill that will power and give you some light into the place that the hole locates. It is actually very useful when you are working in a darker or a place with low light conditions.
Auxiliary Handle
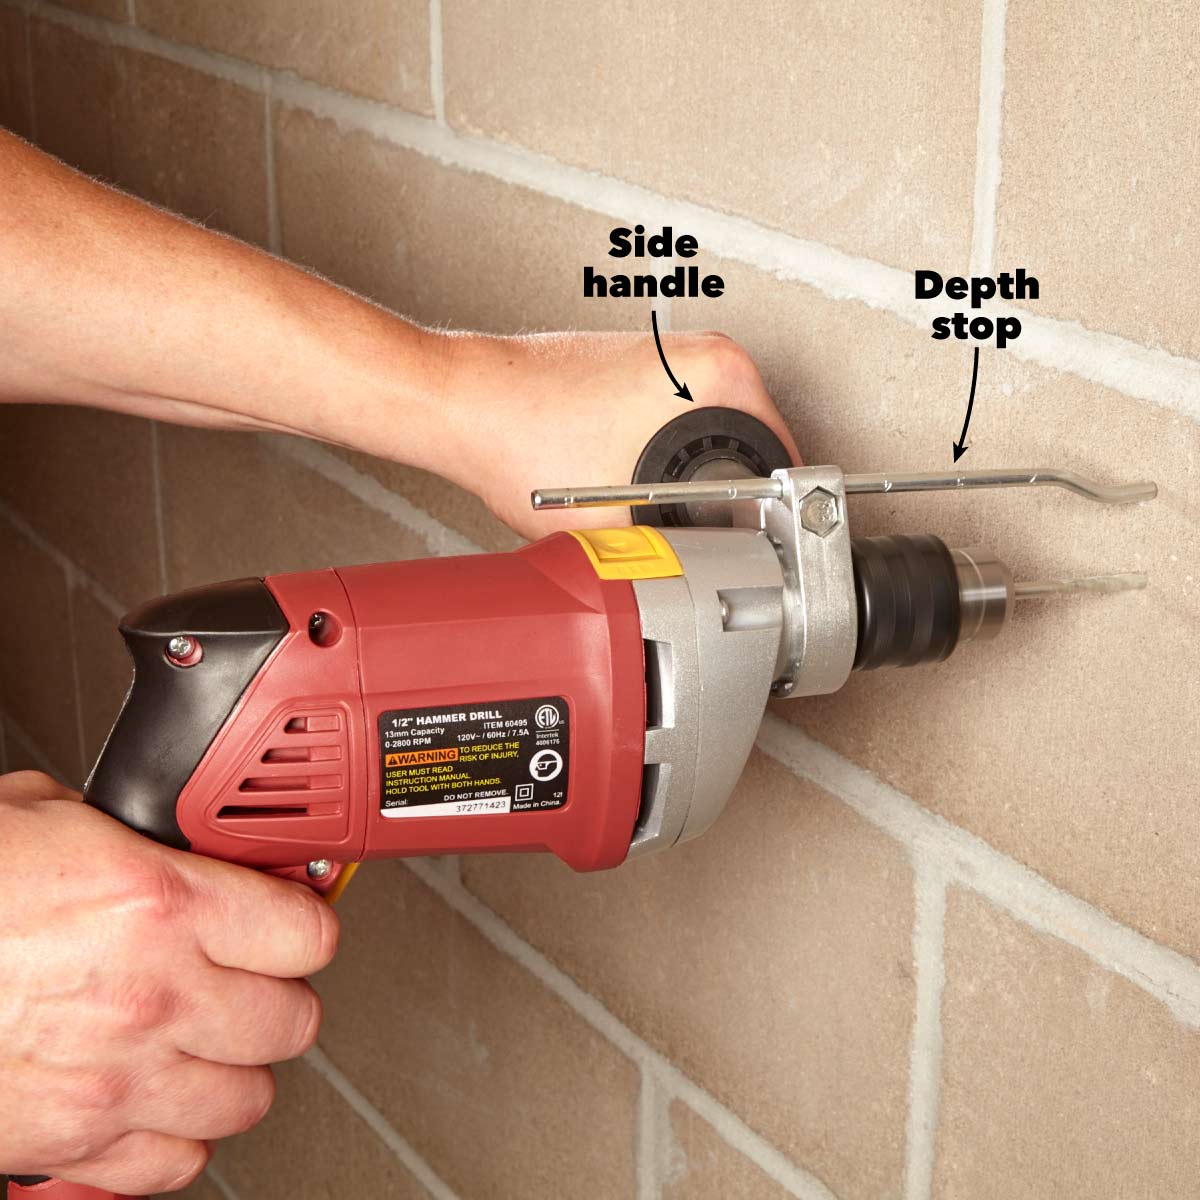
යකඩ, කොන්ක්රීට් බිත්ති වගේ තද මතුපිටක සිදුරු විදිනකොට Drill එක තනි අතකින් අල්ලගෙන ඉන්නවාට වඩා අත් දෙකෙන්ම අල්ලගෙන ඉන්න පුළුවන් නම් ගොඩක් පහසුයි. මේ වගේ වෙලාවට හයි කරගන්න පුළුවන් අමතර කොටසක් විදිහට Auxiliary Handle එක සදහන් කරන්න පුළුවන්.
When you are frilling a hard surface like concrete or metal, it is better if you can catch the Drill from both your hands for proper control. In this case, you can use the Auxiliary handle. It comes as an additional attachment, you can attach or detach from the drill as your favor.
Depth Stop
මේක ගොඩක් වෙලාවට Auxiliary Handle එකත් එක්කමයි එන්නේ. අපිට සිදුරක් විදිද්දී සිදුරේ ගැඹුර සීමා කරන්න ඕන නම් මේ Depth Stop ගැජට් එකේ තියෙන කූරෙන් අදාල ගැඹුර සීමා කරලා සකස් කරන්න පුළුවන්. බිත්ති වල සිදුරු විදිනකොට මේ පහසුකම ගොඩක්ම ප්රයෝජනවත් වෙනවා.
This mostly comes with the Auxiliary Handle. When you are drilling a hole, sometimes you need to stop the drilling at a certain depth. In this scenario, you can use this Depth Stop feature. It is usually a rod with the printed/embossed dimension marks like a ruler. This rod can be adjusted and set the depth limit.
Keyless Chuck
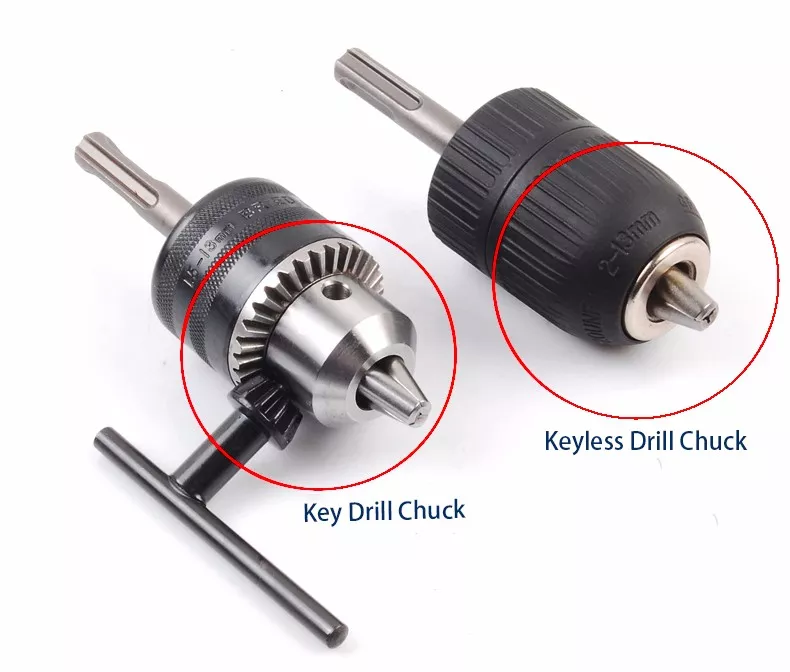
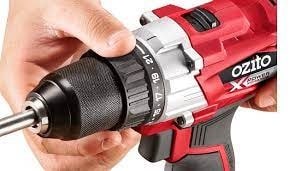
සාමාන්ය Drill එකකට Drill bit එකක් සම්බන්ධ කරද්දී ඒක Chuck (Drill එක ඉස්සරහා තියෙන කොටසක්, පිංතූරේ ලකුණු කරලා තියෙනවා) එකට තද කරන්න වෙනම Key එකක් (යතුරක්) පාවිච්චි කරන්න ඕන. හැබැයි Keyless Chuck පහසුකම තියෙනවා නම් Key එකක් පාවිච්චි කරන්නැතුව අතින් ම Bit එක හයි කරලා තද කරන වැඩේ කරගන්න පුළුවන්.
In regular drills, we need to have a special key to attach and detach drill bits to the Drill Chuck. But if the drill is coming with the Keyless Chuck feature, you don’t need any additional attachments to attach and detach bits, other than your hands. (Please refer the below image)
Function Selector
Drill එකේ සිදුරු විදීමට අමතරව තව පහසුකම් එනවා නම් ඒවා තෝරගන්න මේ Selector Switch එක පාවිච්චි කරන්න පුළුවන්. (මේ අමතර පහසුකම් ගැන ලිපියේ ඉදිරියේදි සදහන් වෙනවා)
If your drill is a multi-functional one, you will see a selector button in your drill to select the function. (Will discuss these additional functions in the latter part of this post.)
Torque Control / Variable Clutch Setting
මේ පහසුකම තියෙනවා නම් Drill එකෙන් Bit එකට ලබාදෙන උපරිම ව්යාවර්තය තෝරලා දෙන්න පුළුවන්. සිදුරු විදින එකටත් වඩා Screwdriver Mode එකේදී තමයි මේ පහසුකම ගොඩක්ම ප්රයෝජනවත් වෙන්නේ. ඇණය තද වුණාට පස්සෙත් Drill එක On කරගෙනම හිටියොත් Clutch එකෙන් Drill Motor එක Bit එකෙන් තාවකාලිකව විසන්දි කරනවා. ඒ නිසා හිරවීමකින් මෝටර් එකට වෙන්න පුළුවන් හානිය අවම වෙනවා.
If your drill coming with the Torque Selection feature, you can select the maximum torque (actually a number from a range) that should be applied to the connected bit. This is mostly used in the Screwdriver Mode, to allow slips after the screw is completely fixed into the position. Once the screw is fixed, a clutch in the drill will temporarily disconnect the motor from the drill shaft, to avoid any damage that happens to the motor coils.
Speed Selector
මේ පහසුකම තියෙනවා නම් Drill එකේ කැරකෙන වේගය (RPM) තෝරන්න පුළුවන්. ගොඩක්ම වෙලාවට වේග දෙකක් තමයි තියෙන්නේ. Screwdriver Mode එකෙන් වැඩ කරද්දී වගේ අඩු වේගයකුත්, සිදුරු විදින වැඩ වලදි වැඩි වේගයකුත් පාවිච්චි කරන්න පුළුවන්.
With this feature, you can select the RPM value of the drill. In most cases, there are two speeds to be selected. Speed Mode 1 is to use with Screwdriver, and Speed Mode 2 is for general purpose drilling works.
Forward and reverse function
මේ පහසුකම තියනවා නම් Drill එක කැරකෙන පැත්ත තෝරන්න පුළුවන්. ගොඩක්ම ප්රයෝජනවත් වෙන්නේ Screwdriver Mode එකේදී ඇණ තද කරන්න සහ ගලවන්නයි.
If you have this feature in your drill, you can select the direction of the rotation of your drill attachment, Clockwise or Counterclockwise. This is mostly used in Screwdriver Mode.
Brushless Motors
සාමාන්ය Drills වල තියෙන්නේ AC හෝ DC Brushed Motors. හැබැයි ඒවාට වඩා මේ Brushless Motors වලින් පහසුවෙන්ම වේගය සහ ව්යාවර්තය පාලනය කරන්න පුළුවන්. Brushed Motors තියෙන Drill වල වගේ කාලෙන් කාලෙට Carbon Brushes මාරු කරන්න ඕන වෙන්නෙත් නෑ.
In general, most of the drills are powered by AC or DC Brushed Motors. But if the drill comes with a Brushless Motor, you can get more power and better control of the torque of the brill. And also there is no requirement of changing the Carbon Brushes from time to time.
Types of Drills
Drill එකකින් ගන්න ප්රධානම වැඩේ තමයි ලී, යකඩ, ප්ලාස්ටික් වගේ දේක සිදුරක් විදගන්න එක. හැබැයි ඒකට විතරක් සීමා වෙන්නේ නැතුව Drill එකකින් ගන්න පුළුවන් වැඩ ගොඩක් තියෙනවා වගේම විශේෂ වැඩවලට අමතර පහසුකම් එක්ක නිර්මාණය කරපු Drills වෙලදපොලේ තියෙනවා.
The main purpose of a Drill is definitely Drilling the holes. But now Drills are not limited to it, and we can see various different drill models, specially designed for different purposes in the market. Let’s discuss a few of them.
Screwdriver
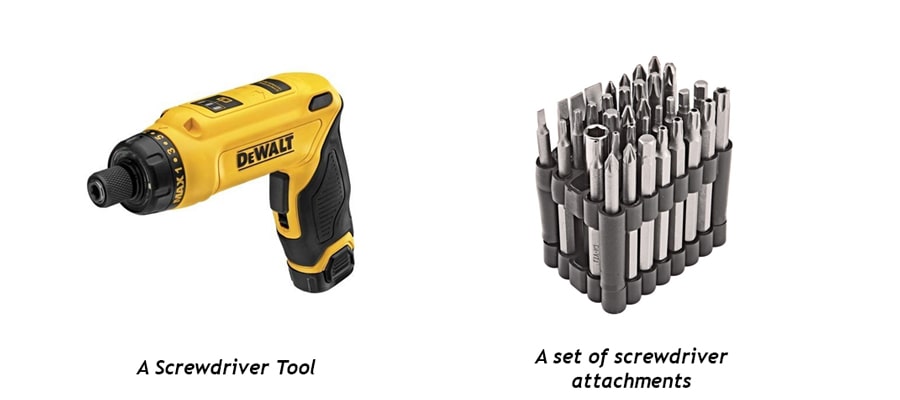
මේ වර්ගයේ Drills විශේෂයෙන්ම හදලා තියෙන්නේ ඉස්කුරුප්පු ඇණ වගේ දේවල් ගලවනවා, තද කරනවා වගේ වැඩ වලට. ගොඩක් වෙලාවට බැටරිය Drill එක ඇතුලෙමයි තියෙන්නේ (inbuilt battery). USB port එකකින් හරි පොඩි DC Charger එකකින් හරි charge කරන්න පුළුවන්. පොඩි RPM එකක් තමයි තියෙන්නේ. හැබැයි ව්යාවර්තය වැඩියි.
Those Drills are specially designed to work with screws and small bolts. Mostly they are powered by an inbuilt battery and can be charged via a USB port or a small DC charger. It has a very small RPM, but higher torque.
Ex: INGCO Cordless Screwdriver
Drill Driver (Drill + Screwdriver)
Drill Drivers කියලා කියන්නේ Screwdriver පහසුකමත් එක්කම එන Drills වලට. Function Selector එකකින් හරි Speed Selector එකකින් හරි වැඩ කරන්න ඕන Mode එක තෝරන්න පුළුවන්. Cordless Drills හැම එකක්ම වගේ Drill Drivers විදිහට තමයි එන්නේ.
Drill Drivers are a combination of General Purpose Drills + Screwdrivers. There is a Function Selector or a Speed Selector to select the operation mode. Most of the Cordless Drills come as Drill Drivers.
Impact Driver
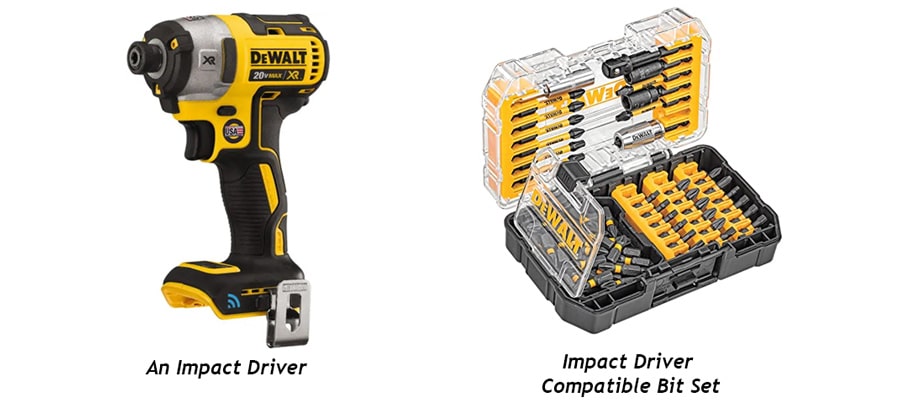
මේක Screwdriver එකේම වඩාත් දියුණු/ප්රබල අවස්ථාවක් විදිහට සලකන්න පුළුවන්. Impact කියන භෞතික විද්යාත්මක මූලධර්මය පාවිච්චි කරලා තමයි මේක සැලසුම් කරලා තියෙන්නේ. ඒ නිසා ඉහල ව්යාවර්තයක් එක්ක ඇණ තද කරන්න පුළුවන් වගේම ඇණ තද කරද්දී අත ආපස්සට කැරකිලා ඇඹරිලා යන්න බලනවා වගේ ගතියත් මේකෙදී සෑහෙන්න අඩුයි. ලී වලට ස්කුරුප්පු ඇණ අල්ලන එක, යකඩ විදින එක වගේ ටිකක් වැඩි ව්යාවර්තයක් ඕන වැඩ වලට මේක පාවිච්චි කරනවා.
This is similar to a screwdriver, but with more power (heavy-duty screwdriver). The tool is designed using the concept of the impact in physics. Due to its Impact Mechanism, it can transfer a large torque through its chuck. Due to power is transferred to the bit using the Impact Effect, the resistance feels to the wrist is much low. This tool is used to tightening bolt heads, nuts and screws.
Impact Wrench
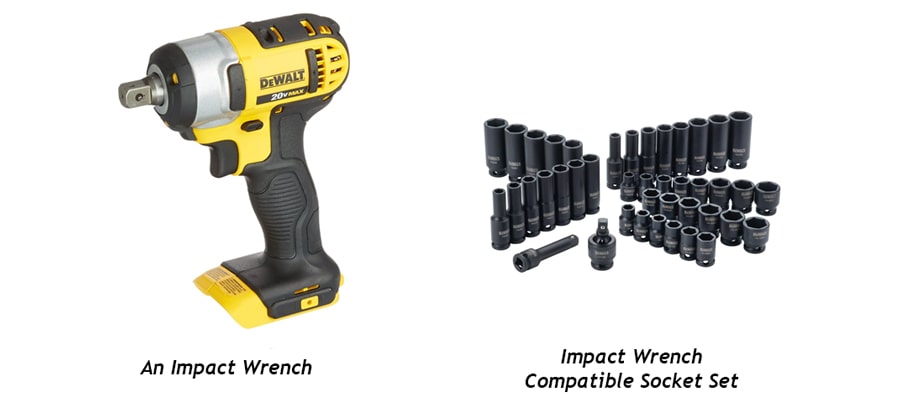
මේකත් ක්රියාකාරිත්වය අතින් Impact Driver එකට සමානයි. වෙනසකට තියෙන්නේ මේක පාවිච්චි වෙන්නේ Sockets හයි කරන්න සහ ගලවන්නයි. (උදා: වාහනවල රෝද හයි කරලා තියෙන බෝල්ට් ඇණ වගේ දේවල්) 300 Nm ඉදලා ඉහල ව්යාවර්ත වලින් වගේම 1/2”, 3/4”, 1” වගේ Socket ප්රමාණය වලින් මේවා තෝරගන්න තියෙනවා.
The working concept is similar to the Impact Driver. But Impact Wrenches are more powerful and used to remove and tight large bolts. (Ex: Nuts in-vehicle rims) Impact Wrenches are available in higher torque ranges starts from 300 Nm, and different head (square head) sizes such as 1/2”, 3/4”, 1”.
Hammer Drill / Rotary Hammer
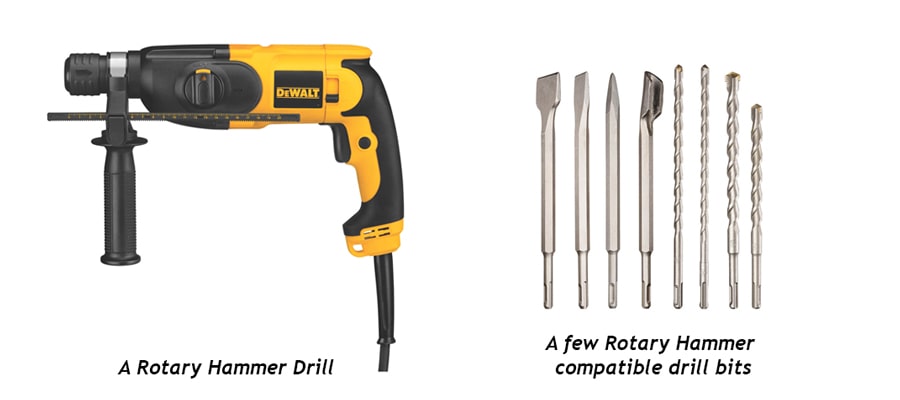
කොන්ක්රීට් වගේ දැඩි මතුපිටක සිදුරු විදිනවා නම් මේ වර්ගයේ Drills ගොඩක් ප්රයෝජනවත් වෙනවා. මේකෙදි Drill කටුව කැරකෙනවාට අමතරව මිටියකින් ඇණේකට ගහද්දි වගේ ඉස්සර පස්සට යන ගතියකුත් එකතු වෙනවා. ඒ නිසා සිදුරු විදිනකොට Drill එක අතෙන් තද කරලා ලොකු බලයක් දෙන්න ඕන වෙන්නේ නෑ.
When Drilling a hard surface like concrete, this type of Drill is very useful since, with the hammer mode, drill bits are going toward and backward while rotating. With this specific motion like a hammer is used against a nail, the drilling process becomes easy because the operator doesn’t require to put a high force into the Drill.
SDS Hammer Drill
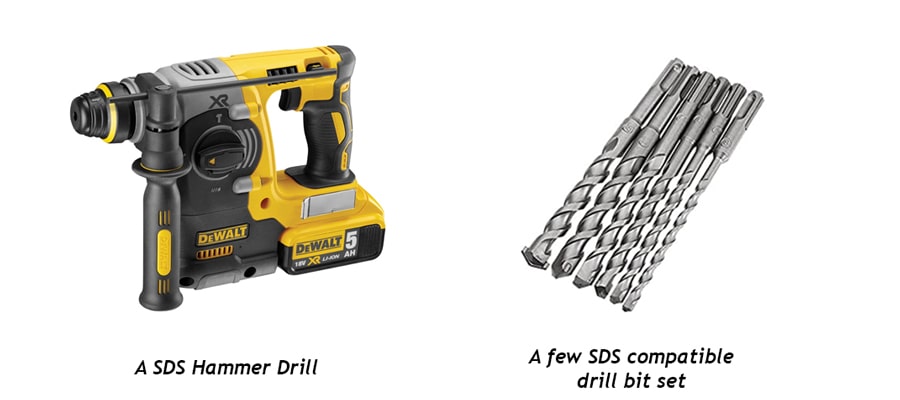
මේකත් ගොඩක්ම hammer Drill එකට සමානයි. වෙනසකට තියෙන්නේ සාමාන්ය Hammer ක්රියාවලිය වෙනුවට SDS function (Slotted Drive System) කියන එක පාවිච්චි වෙන එකයි. මේකෙදි පිස්ටන් එකක්.ඉස්සරහට පස්සට යනවා වගේ Drill Bit එක Chuck එකත් එක්ක චලනය වෙනවා. මේ Drill එක්ක පාවිච්චි කරන්න වෙනම හදලා තියෙන SDS Bits පාවිච්චි කරන්න ඕන.
This also similar to the Hammer Drillsh but more advance. These devices are using a special motion function known as the SDS function (Slotted Drive System), which moves the Drill bits forward and backward like tiny punches. Since this behavior, we can use only some bits, specially designed to work with this tool.
Ex: INGCO SDS Plus Rotary Hammer
Breakers & Demolition Hammer
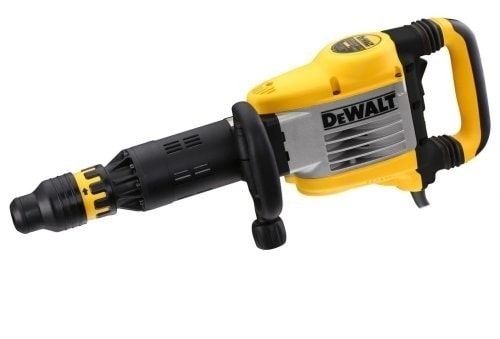
මේවා නම් ගොඩක් වෙලාවට පාවිච්චි වෙන්නේ සිදුරු විදිනවාටත් වඩා කොන්ක්රීට්, ගඩොල් බිත්ති වගේ දේවල් කඩලා ඉවත් කරන වැඩ වලට. මේවා මිලෙන් අධිකයි වගේම ගොඩක් ලොකු Wattage එකක් තියෙනවා.
This tool is also another variation of the Drills but mostly used to break the concrete and harder materials rather than Drilling holes. Those tools are very expensive as well as very powerful.
මේ ලිපියෙන් බලාපොරොත්තු වුණේ Drills & Drivers ගැන සරල හැදින්වීමක් ලබාදෙන එකයි. පුළුවන් තරම් සරලව කරුණු ඉදිරිපත් කරන්න තමයි උත්සාහ කලේ. DIY වැඩ කරන අයට, නව නිපැයුම් කරන අයට වැදගත් සහ ප්රයෝජනවත් වෙන උපකරණ ගැන තවත් ලිපි ඉදිරියෙදි පලකරන්න බලන්නම්.
The main objective of this post was to give a basic introduction to the Drills and Drivers, their functionalities & features, and the available variations of the Drills. I was tried my best to explain things simply, without going into deep facts. I hope to continue this post with some other tools useful for innovators and DIY hobbyists in the future.