Better Git Branching Strategy for a Large-Scale Multi-Team Projects
There is no doubt that Git is taking the lead in modern software version control. You can’t survive in the world of software development without knowing what and how to use Git. It excels at coordinating multiple developers' contributions, helping teams avoid common pitfalls like code conflicts and unintended overwrites.
However, as software projects scale and teams grow larger, complexities inevitably arise. Managing parallel development workflows, coordinating numerous features, and ensuring consistency across multiple environments becomes increasingly challenging.
For that, Git provides various features, and branching is one of the powerful features provided by Git. It helps to create a branch from the main codebase and work independently on the newly created branch, without affecting the main codebase. And when you like to apply the changes you have made into the main codebase, you can choose either the pull request or the merge provided by Git.
This sounds straightforward, but when multiple teams simultaneously working on diverse features on the same codebase can become complex. Without a clear and disciplined branching strategy, the repository turns into a battlefield:
- A developer merges their feature directly into the main branch, unaware of compatibility issues introduced by another team's recent changes.
- A hotfix needs to go live immediately, but no one knows which branch reflects the current production state.
- The staging environment falls out of sync with production because changes weren't systematically propagated.
These situations illustrate the chaos that can ensue when branching policies are unclear or poorly enforced. The solution isn't necessarily creating more branches; instead, clarity, discipline, and simplicity are most wanted things by many teams.
In this article, I will present a streamlined and effective Git branching strategy designed to mitigate these common issues. This strategy emphasizes simplicity, automation, and traceability, aligning closely with continuous integration and DevOps. It's practical, opinionated, and proven to facilitate faster shipping, reduce friction, and build confidence across all deployment environments.
Branching with Purpose
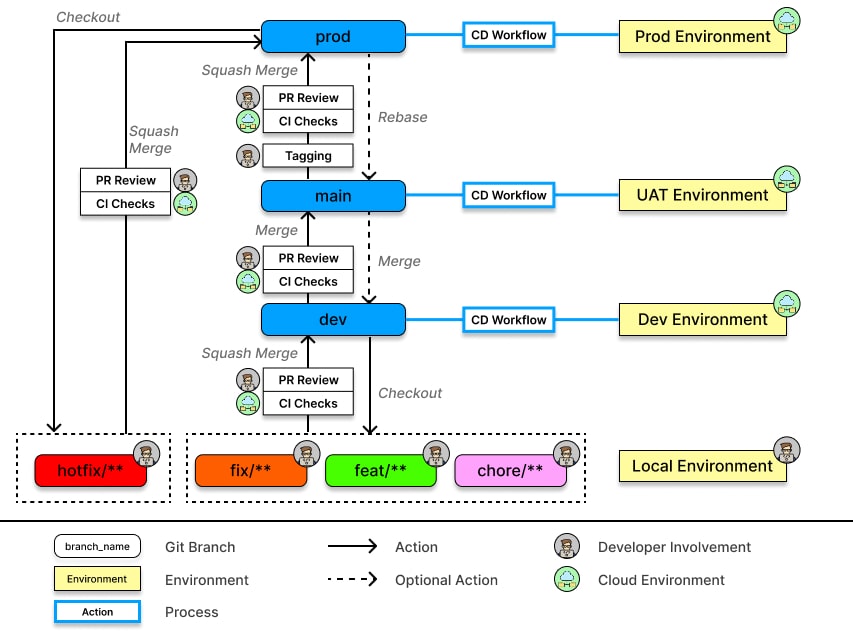
To effectively manage Git repositories in large-scale projects, adopting a clear branching strategy is crucial. One widely adopted approach is the Three-Branch Strategy, popular among enterprise-level teams due to its simplicity and clarity.
Long-lived Branches
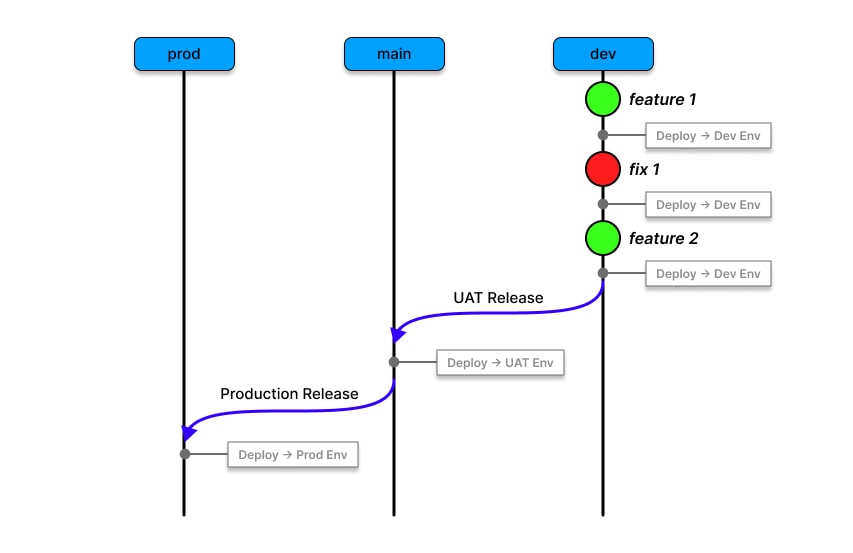
Long-lived branches map directly to deployment environments, as follows:
-
dev branch (Development Environment): Acts as the integration branch, where all new feature branches
initially merge. The
devbranch collects the latest changes from all teams for preliminary testing. Merging intodevcan trigger automated deployments (CI/CD pipelines) to a testing environment for quality assurance. -
main branch (Staging/Pre-production): Holds thoroughly tested, stable code ready for release. Only
features verified and completed in
devare promoted here. Themainbranch effectively serves as a staging or User Acceptance Testing (UAT) environment, preparing the codebase for production release. -
prod branch (Production): Reflects the actual production state. Only fully tested and approved code,
which has passed through
devandmain, is merged intoprod. Changes in theprodbranch trigger live deployments. Typically, updates toprodoccur through merges frommainafter release approval.
dev,
main, and prod) mapped to their respective deployment environments.As best practice, these long-lived branches should never be directly pushed to; instead, all changes must pass through Pull Requests (PRs) reviewed and approved by other developers.
Short-lived Branches
Short-lived branches are lightweight in terms of code changes, having a short lifespan, and contain changes related to a specific task or feature. Based on the task, one or a few developers will be working on a branch, but always recommended to have one developer per branch to avoid conflicts and un-synchronized changes.
Short-lived branches typically originate from the dev branch and, once the task is implemented, will be merged
back into dev or another relevant feature branch.
As a best practice, it is better to adopt a standardized naming convention for clarity and consistency. Here is a recommendation:
{prefix}/{ticket_id}-{short_slug}
-
prefix: The prefix describes the branch's purpose:
feat– Introduces new functionality.fix– Resolves minor or non-urgent bugs.hotfix– Quickly addresses critical issues in the production environment.-
chore– Handles routine maintenance tasks like dependency updates, without altering functionality.
- ticket_id: Associates the branch with a specific ticket or issue, facilitating task tracking and team coordination. (Example: Jira ticket IDs [1])
- short_slug: A concise, descriptive title enhances quick identification beyond the ticket ID alone.
Handling Branching on Mono Repos
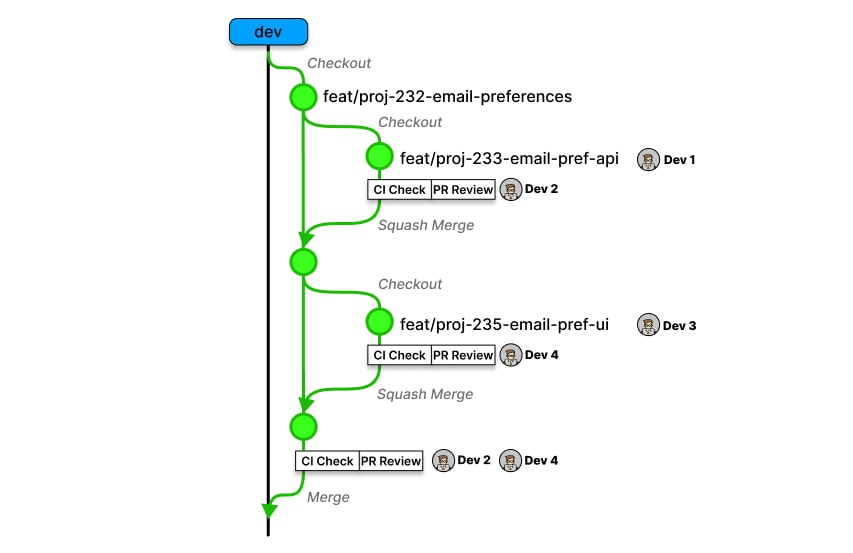
Mono Repos[2], where multiple services (Ex: Frontend + Backend / a few Microservices) are keeping within a single repository (with well-defined relationships), can also benefit from this strategy. For monorepo setups, multiple developers might concurrently work on a single feature. In these situations, create a central feature branch and individual task-specific sub-branches per developer. Once completed, merge these sub-branches back into the central feature branch.
Two effective branch naming strategies can be chosen:
-
Strategy I: Use suffixes indicating task specifics, under same task/feature identifier:
-
Example:
feature/PROJ-123-api,feature/PROJ-123-ui
-
Example:
-
Strategy II: Establish subtasks linked to the primary task/feature identifier:
- PROJ-123: Feature →
feature/PROJ-123-feature-name -
PROJ-124: Subtask →
feature/PROJ-124-feature-api-implementations -
PROJ-125: Subtask →
feature/PROJ-125-feature-ui-implementation
- PROJ-123: Feature →
Development Workflow
Modern software development and DevOps practices emphasize rapid, frequent product deliveries, making efficient and streamlined workflows essential. Automation through Continuous Integration and Continuous Delivery (CI/CD) pipelines is fundamental to achieving these goals. Thus, any effective branching strategy must facilitate rapid iteration, clear traceability, and robust automated checks.
Below is a recommended workflow:
Step-by-Step Development Workflow
-
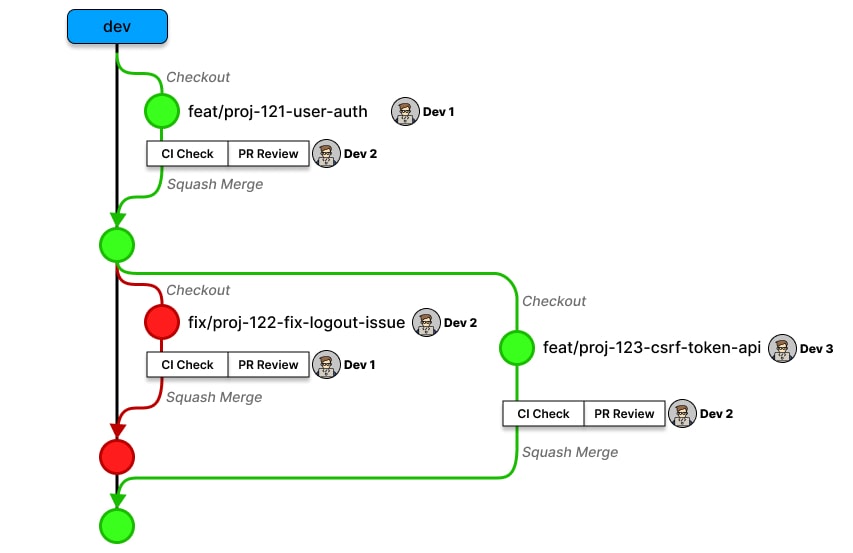
Feature Implementation: Developers branch off from the
devbranch to implement individual features, and submitting a Pull Request (PR) back into thedevbranch upon completion. -
Pull Request Review and CI Checks:
- PRs required to be peer review by a co-developer (review on the logic, and best coding practices).
- Essential CI checks related to code quality such as linting, unit tests, integration tests, code quality analysis, and vulnerability scanning should run automatically on each PR.
-
Use the Squash Merge strategy for merging PRs into
dev, ensuring one clear, descriptive commit per feature/pull request.
-
QA Validation on Dev Environment:
-
After merging a feature(s) into the
devbranch, it should automatically deploy changes to a designated development or test environment. (Otherwise, manually deploy thedevbranch to a development or QA environment). - Perform Quality Assurance (QA) validation on new features/bug fixes at this stage.
-
After merging a feature(s) into the
-
Preparing for Release:
-
Once features are stable, prepare for the next major or minor release by merging changes from
devinto themainbranch. -
Alternatively, create a dedicated release branch from
main, selectively cherry-picking stable features. This approach is particularly beneficial when managing multiple parallel feature sets or phased feature releases.
-
Once features are stable, prepare for the next major or minor release by merging changes from
-
User Acceptance Testing (UAT):
-
Merge the release-ready code from the
devor release branch into themainbranch (use a standard merge strategy, not squash - this will be helpful to generate release notes). -
Deploy the
mainbranch to a staging or UAT environment for final regression and individual feature testing. The testing duration can be aligned with the project's overall timeline, queueing approved features for the next public or production release.
-
Merge the release-ready code from the
- Production Release Tagging:
- Release Management:
-
Deploying to Production:
-
After tagging, perform a Squash Merge from the
mainbranch into theprodbranch. -
Configure an automated deployment pipeline to trigger upon updates to the
prodbranch, or conduct the release deployment manually from this branch as needed.
-
After tagging, perform a Squash Merge from the
Branch Management Rules
- Deletion of Feature Branches: Delete feature branches immediately following a successful merge to maintain repository cleanliness.
-
Branch Protection: Protect
dev,main, andprodbranches from direct pushes. All changes must occur via Pull Requests reviewed and approved by at least one other developer. - CI Checks Enforcement: Execute mandatory CI checks, including linting and testing, on every PR targeting any of the three long-lived branches.
-
Efficient CI Execution: Run resource-intensive checks (e.g., End-to-End tests) primarily against PRs
targeting the
mainbranch. This approach ensures early identification of critical issues without frequent disruptions to the development process.
Handling Bugs with Confidence
Not all work involves planned feature development; managing bugs effectively is equally important. The strategy categorizes "fix branches" into two main types:
1. Bug Fix Branches
Any bug identified during the QA process should be documented in a ticketing or project management system. Address these
bugs using dedicated bug fix branches, adhering to a naming convention such as
fix/PROJ-123-bug-description.
Typically, bug fix branches originate from the dev branch since QA tests primarily occur in that environment.
If a bug surfaces during User Acceptance Testing (UAT), developers should carefully decide whether to branch off from the
main or dev branch, based on the context and urgency. Regardless, all bug fixes must be merged
back into the dev branch and follow the same review and CI processes as regular features.
2. Hot Fix Branches
Hot-fixes address urgent issues discovered in the production environment, requiring immediate attention. These branches
should originate directly from the prod branch and follow a naming convention beginning with hotfix, such as
hotfix/PROJ-123-critical-issue.
Once resolved, changes from the hotfix branch should first merge back into the
prod branch through a Squash Merge, providing confidence that the critical issue is promptly
addressed. Afterward, ensure to merge the updated production branch back into main, perform a patch release
with an appropriate tag, and finally merge/rebase main back into dev. This ensures all branches
remain synchronized. After successful integration across all branches, safely delete the hotfix branch.
Tagging the Changes
Tagging was briefly introduced earlier in the Development Workflow section, but here we will explore it in detail and consider alternative methods.
One main alternative to tagging is "branches per release", which suggests creating a separate branch for each release,
preserving it permanently as a snapshot. (Example: release/v1.2.3).
However, Tags offer a more robust and effective approach, clearly marking specific commits as release points or milestones. It is more similar to marking a checkpoint on the code base, saying that this is the version of the code we have released into the live. It makes a historical record and also makes it easy to do a rollback or comparison.
Tagging Methods
1. Semantic Versioning
Uses incremental version numbers following the v{MAJOR}.{MINOR}.{PATCH} format:
-
Increment PATCH for minor updates, hot-fixes, or tiny adjustments (e.g.,
v1.0.0→v1.0.1). -
Increment MINOR when adding new, backward-compatible features or significant improvements (e.g.,
v1.0.0→v1.1.0). -
Increment MAJOR when introducing significant changes or backward-incompatible updates (e.g.,
v1.0.0→v2.0.0).
2. Release Date Tagging
Simpler than semantic versioning, this method labels releases by date
-
Format examples:
release-2025-07-01or, if multiple releases occur on the same day,release-2025-07-01-v1. - Usually sufficient for straightforward projects, but it lacks the detailed semantic meaning provided by semantic versioning.
CI/CD Integration with Branch Names
It is easy to set up Continuous Integration and Continuous Deployment (CI/CD) workflows with a properly designed branching strategy. Although some suggestions were introduced in the Development Workflow section, here we can discuss them deeply.
Environment Deployments
One of the primary benefits of the Three-Branch Strategy is its alignment with environment-specific deployments. Utilizing branch naming conventions makes configuring deployment triggers straightforward:
devbranch → Automatically deploy to the Development Environment for initial testing.-
mainbranch → Deploy to the Staging or User Acceptance Testing (UAT) environment for comprehensive pre-release testing. prodbranch → Deploy directly to the Production environment after final approval.
Tools such as GitHub Actions or Jenkins can be configured to use branch patterns to trigger deployments seamlessly.
on:
  push:
    branches: ['main']

jobs:
  deploy:
    ...
Continuous Testing
A consistent branch naming strategy enables streamlined and efficient setup of continuous testing workflows. While comprehensive testing for every change ensures quality, balancing resource use and developer productivity is essential, because workflows will incur costs for every minute they use the cloud resources, and also will block the development workflow, where developers have to wait until all CI checks are passed to merge and promote the changes through the process.
Therefore, developing an optimized CI strategy is crucial for efficiency and effectiveness. However, types of CI tests vary with the technologies, tools, languages, and frameworks used in each project, and it is a bit difficult to provide a general strategy. Here are a few suggestions you can consider to set up your own testing strategy.
| Test | Purpose | When to Run |
|---|---|---|
| Lint / Format / Type-Check | Check for syntax errors, style, and static typing |
PR → dev (early feedback)PR → main (ensure main stays clean)
|
| Unit Tests | Isolated functional testing |
PR → devPR → main
|
| Coverage & Quality Gates | Enforce minimum coverage, complexity, and duplication |
PR → main(Optional) Nightly on main
|
| Security Scans (SAST CVE) |
SAST (Static Application Security Testing, like GitHub CodeQL) CVEs (Common Vulnerabilities and Exposures, like GitHub Dependabot) |
PR → dev/main (SAST)nightly on dev (CVE)
|
| Build & Package | Compile, Docker image, artifact creation |
Push → dev/mainpush → prod (for release candidates)
|
| Integration Tests | Testing DB/API/services interaction |
Push → dev (smoke-fast suite)PR → main (full integration) (Optional) Nightly on
main
|
| E2E Tests | UI/workflow validation |
PR → main (gated before merge)push → main (against staging)
|
|
Performance / Load Tests |
Benchmark critical paths, catch regressions | Scheduled (e.g., nightly or weekly on main) |
|
Smoke Test/ Post-Deploy Tests |
Basic health checks after deployment |
After deploy into UAT/stagingAfter deploy into Production
|
In addition to the integration of the CI workflows, protect
main and prod branches by enforcing mandatory pull request reviews and passing required CI
checks.
Also, by gating PRs into the dev branch through automated CI checks can ensured that every code change
maintains high standards, thereby keeping the codebase consistently clean, detecting regressions promptly, and providing
rapid feedback to developers.
Conclusion
In summary, adopting a structured Git branching strategy significantly enhances the effectiveness of managing large-scale, multi-team software projects.
This article introduces a robust Three-Branch Strategy, comprising dev, main, and
prod branches; each clearly mapped to development, staging/UAT, and production environments, respectively.
Long-lived branches serve stable deployment environments, whereas short-lived branches facilitate isolated, manageable feature development and bug fixes, using clear naming conventions for optimal traceability.
The outlined workflow integrates seamlessly with modern Continuous Integration and Continuous Deployment (CI/CD) practices, emphasizing automated testing, peer-reviewed Pull Requests, and disciplined merge strategies (such as squash merges). Critical branches are protected from direct pushes, ensuring rigorous quality control and preventing inadvertent deployment issues.
Furthermore, strategic tagging, particularly Semantic Versioning, is recommended for precise version tracking and release management. Efficiently managed continuous testing and CI workflows enhance developer productivity by balancing comprehensive testing against resource constraints.
Ultimately, this disciplined, automated approach ensures consistency across environments, accelerates software delivery, minimizes conflicts, and builds confidence in releases, making it an ideal strategy for scaling complex, multi-team projects effectively.
References
- Integrate Jira Software with GitHub (https://support.atlassian.com)
- Monorepo (https://en.wikipedia.org/wiki/Monorepo)
- Semantic Versioning 2.0.0 (http://semver.org)
- Releases in GitHub (https://docs.github.com)